How Can We Help?
Search for answers or browse our knowledge base.
Get Link to Results for Files Search
Purpose
Using the Get Link to Results feature generates a link to the results of a file search that has been performed. The feature offers two formats in which the file can be exported to, CSV and JSON.
Once configured in Excel or a JSON application, the link will produce identical results to the file search that can be saved to the local host machine and accessed at any time. From this point forward, the file will automatically update with new files matching the search criteria, allowing for an up-to-date view of all the search results.
Please Note: When a file is exported to a CSV file format, the Get Link to Results feature steps differ for the first time this process is completed vs any subsequent times this feature is used.
Get Link to Results – Initial Feature Use – CSV File Format
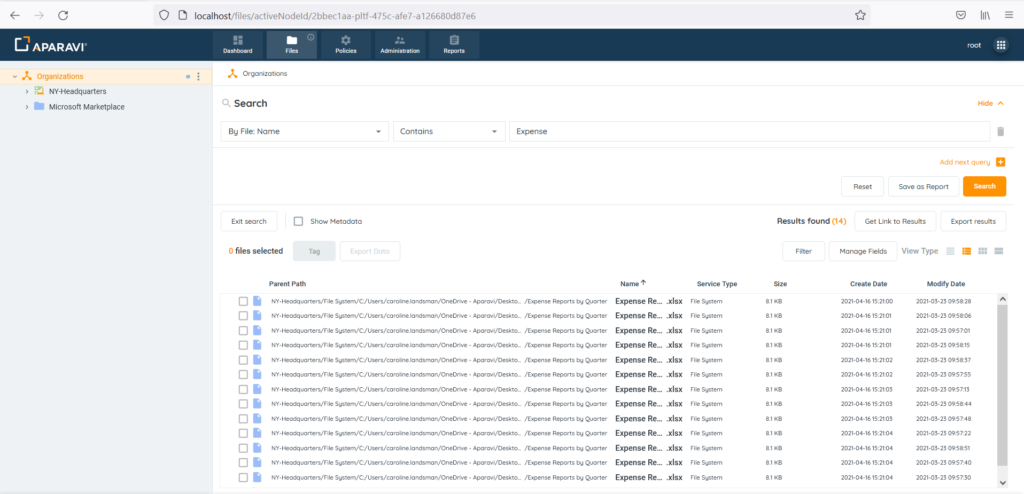
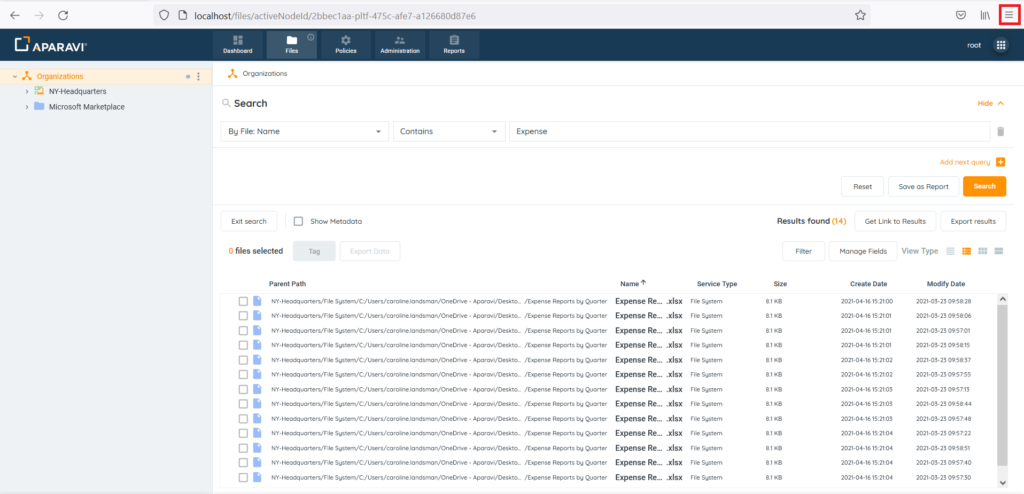
- Click on the File tab in the top navigation menu and complete a file search.
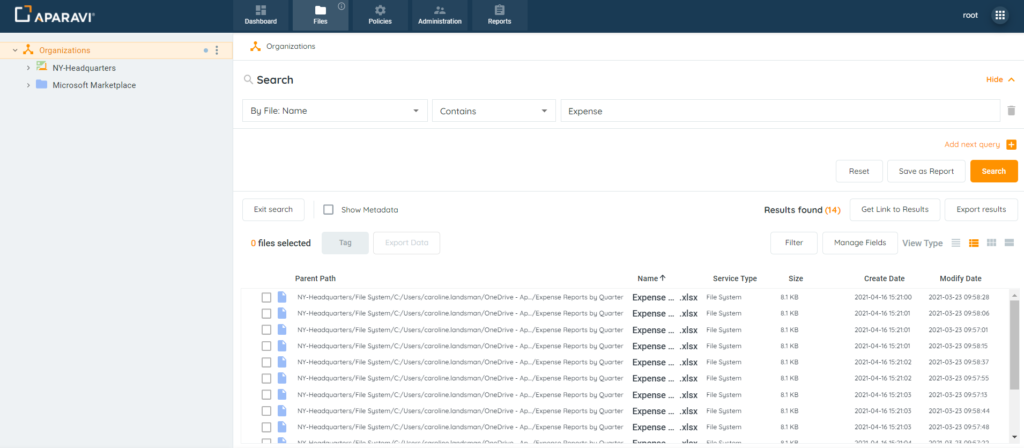
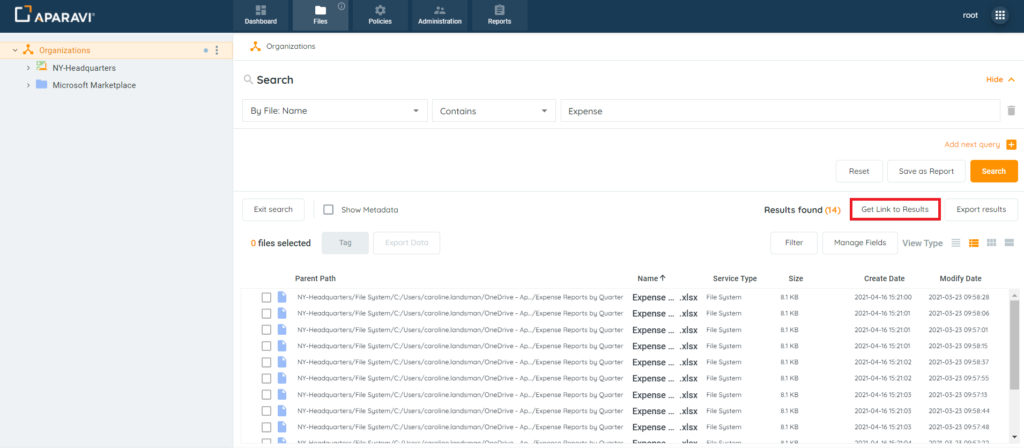
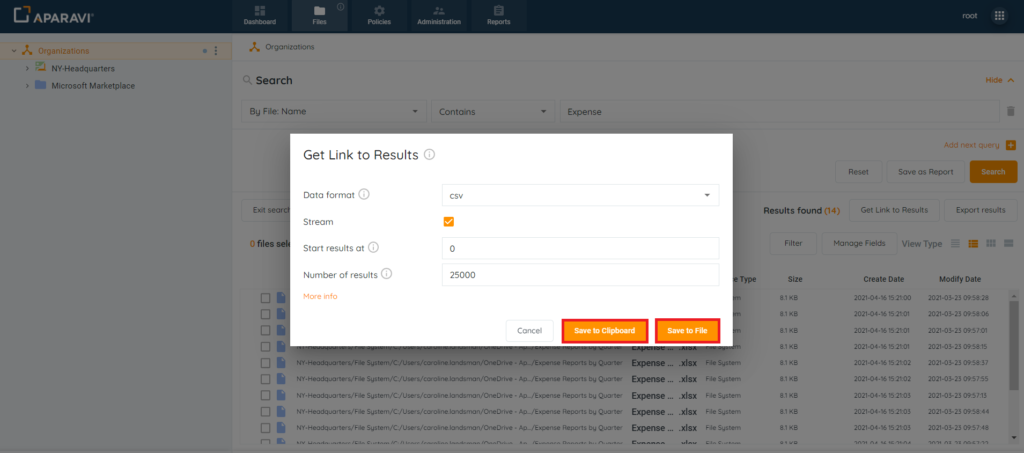
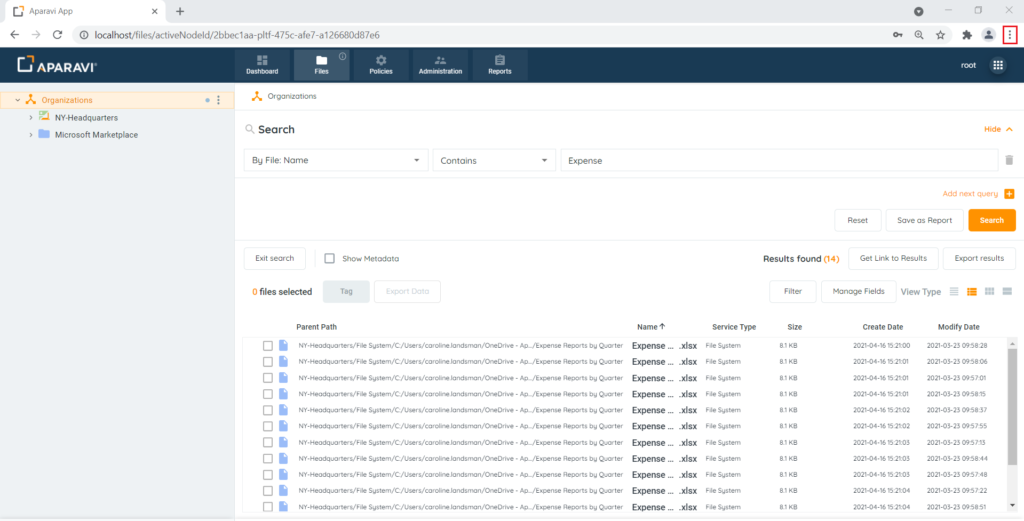
2. Once the file results are displaying, click on the Get Link to Results button that appears in the toolbar above the file results. Once clicked, the Get Link to Results pop-up box will display.
3. Inside the Get Link to Results pop-up box, configure the settings for the generated link.
Configuration Options:
- Export type – select the output format for your query results. The options are csv and json formats.
- Stream – the maximum number of query results returned is 25,000. If your results are greater than this limit, you can use the Stream option to paginate your results per URL (25,000 max for each link generated). By default the Stream option is enabled.
- Start results at – Enter the position to start the query results.
- Number of results – Enter the number of results to include, starting from the Start results at value.
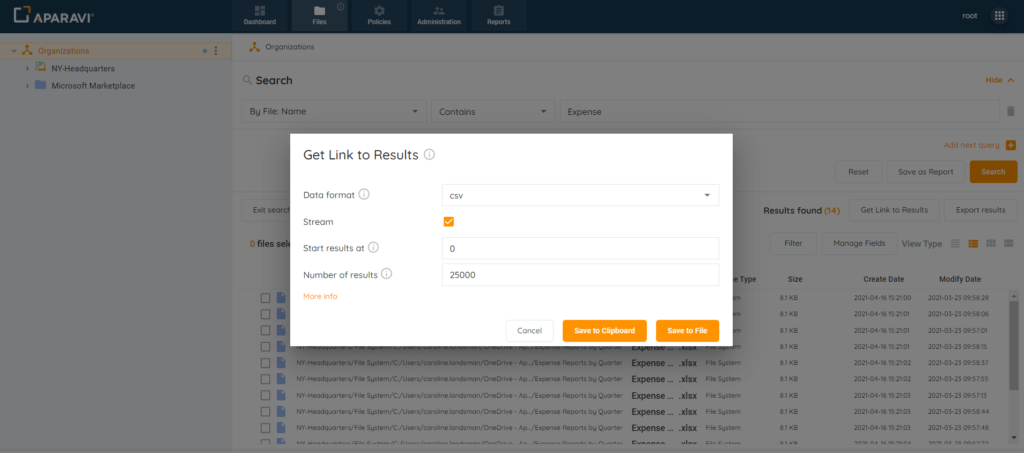
4. Once all settings have been configured, the system offers two options to gain access to the link:
- Save to Clipboard – selecting this button will save the generated URL to your local computer’s clipboard. This link can then be directly pasted into Excel.
- Save to File – selecting this button will save the generated URL to a file on your local computer (location determined by your browser setting for downloads). Once the file has been downloaded, it can be opened to copy and paste the URL into Excel.
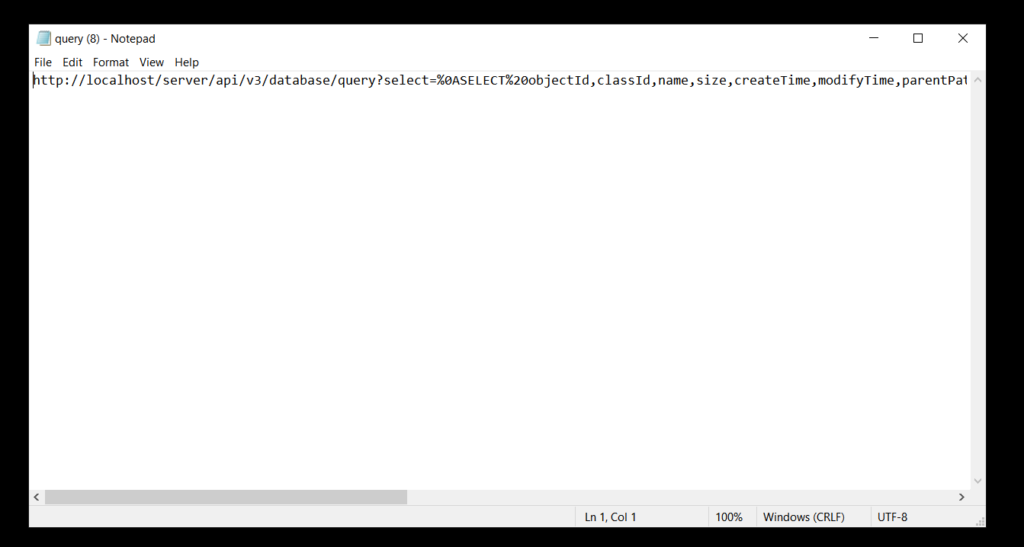
5. Depending on the option that was selected in the step above, obtain the link that was generated and copy it.
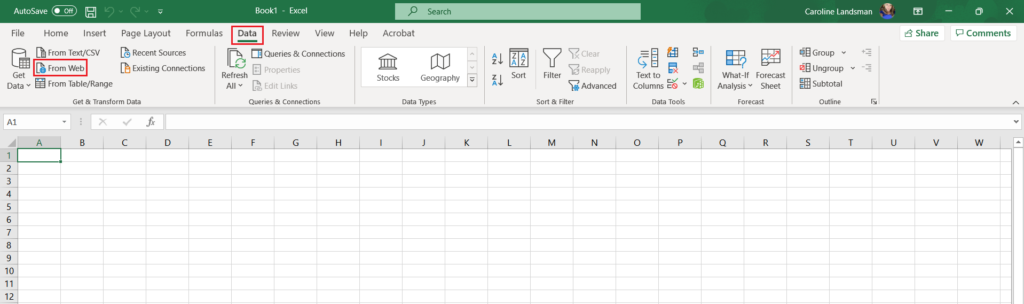
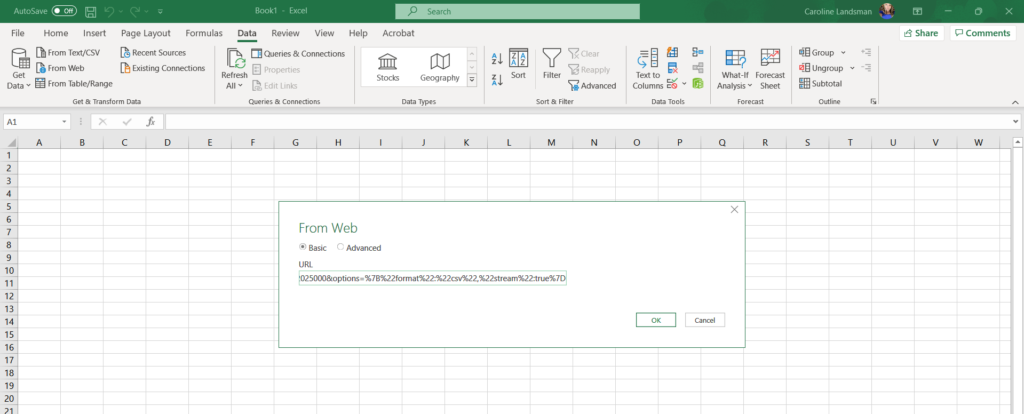
6. Open Microsoft Excel on the local host machine and click on the Data navigation tab. Once there, click on the From Web button, located in the upper left-hand side of the Excel spreadsheet toolbar.
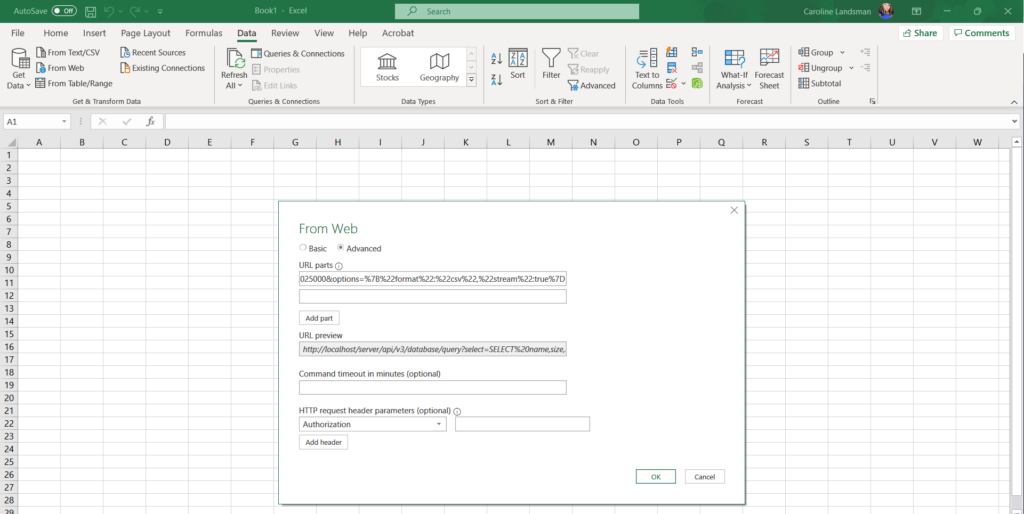
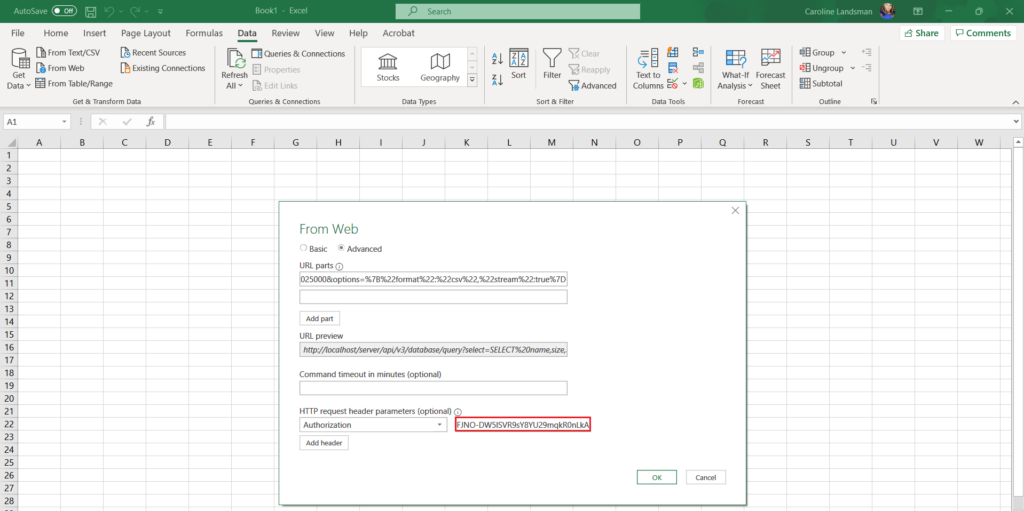
7. Once the From Web pop-up box appears, click on the Advanced option, located at the top. Once clicked, the pop-up box will expand and additional options will be offered.
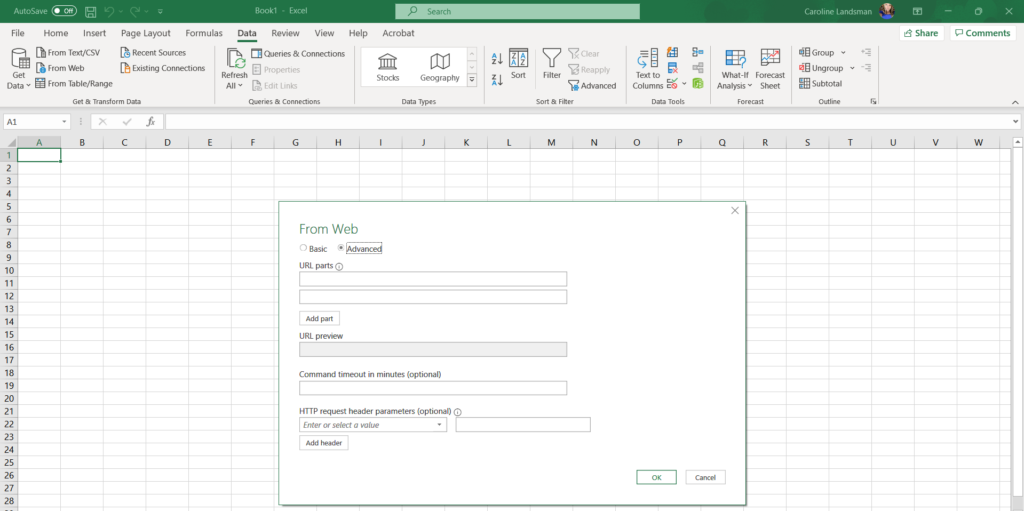
8. Inside the From Web pop-up box, complete the following:
URL Parts: Paste the URL that was copied in Step #5 into the top textbox.
URL Preview: The system will automatically display a preview of the generated URL.
HTTP request header parameters: Type in the word [Authorization] into the first field.
Please Note: Although this field is a drop-down menu, Authorization is not an option offered, so the word must be manually typed in.
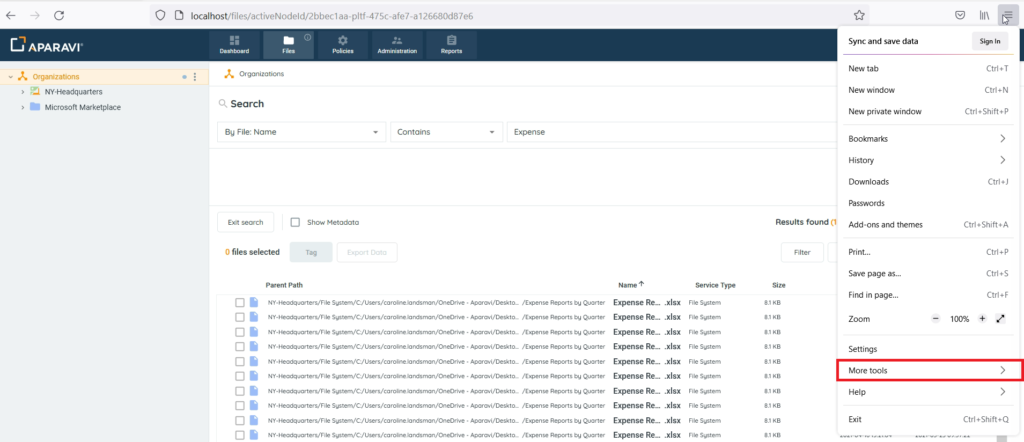
9. At this point the Aparavi API token must be obtained through opening the browser’s developer tools. Depending on which browser is being used, will depend on the steps to reach the developer tools.
Open Developer Tools in Chrome:
- Return to the Chrome browser and log into the Aparavi Platform (Stay on this webpage and do not leave before completing next step).
- Click on the 3 dots that appear in the upper right-hand corner of the Chrome browser.
- When the menu appears, hover over the [More tools] option until a sub-menu appears.
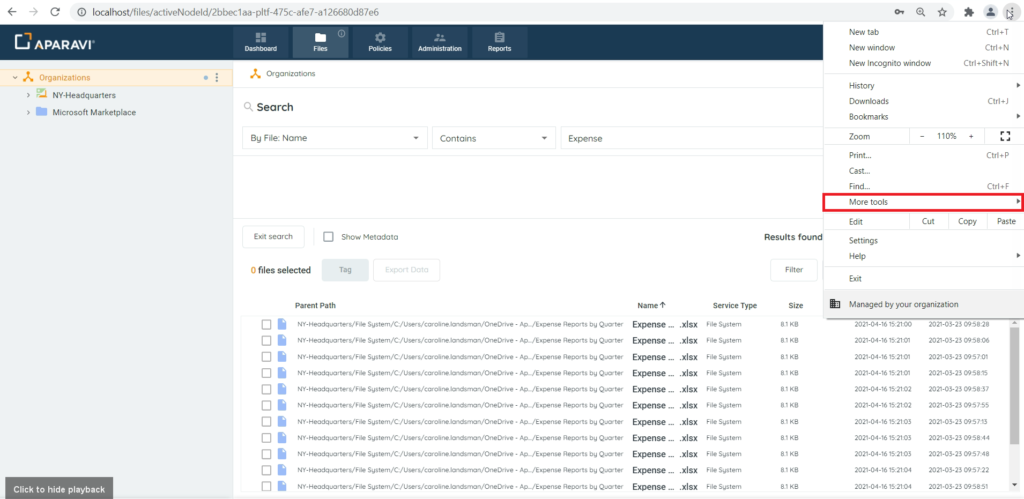
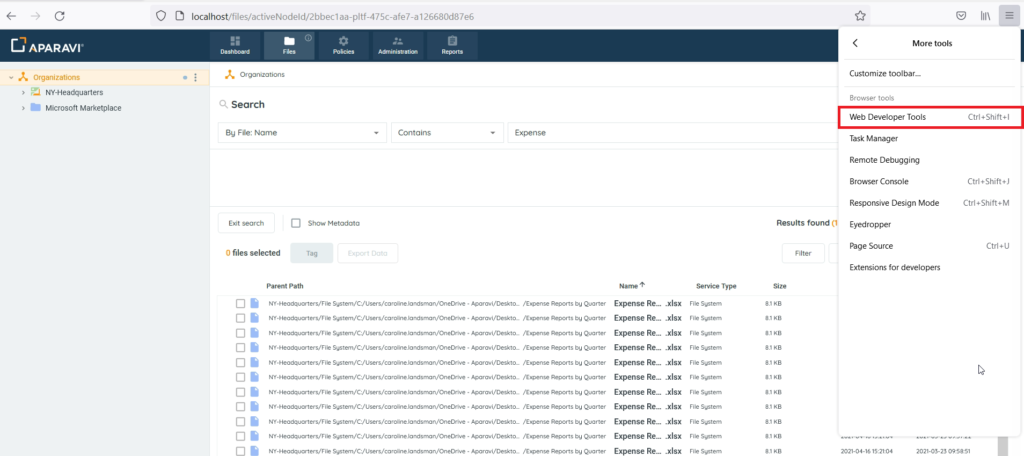
- Once the sub-menu is displaying, click on the [Developer tools] option.
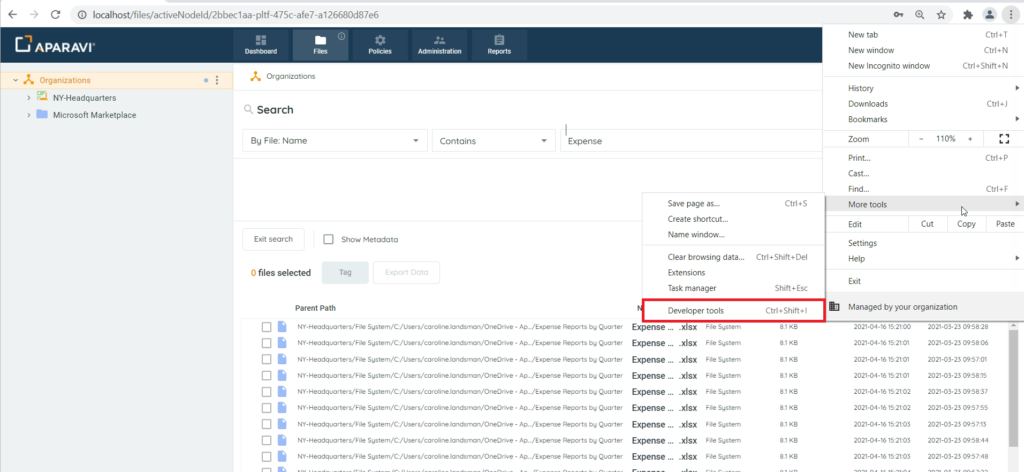
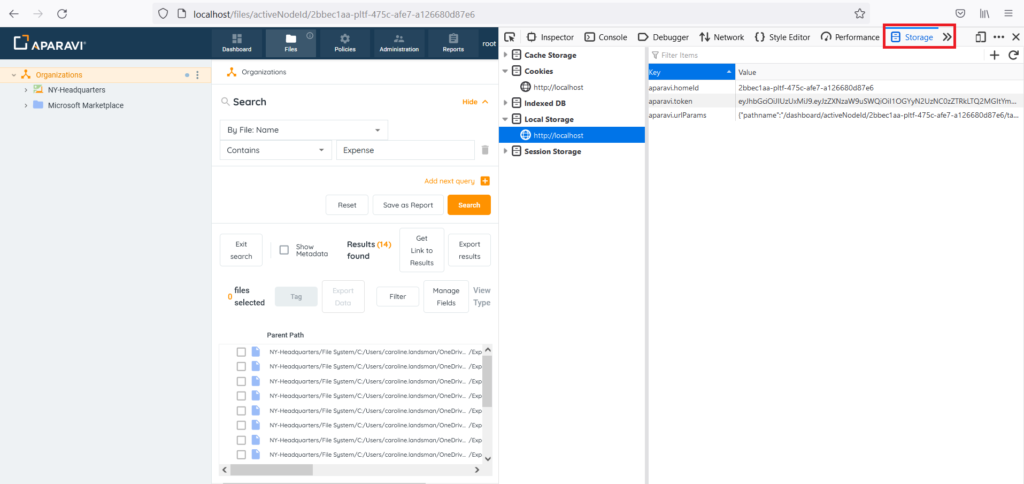
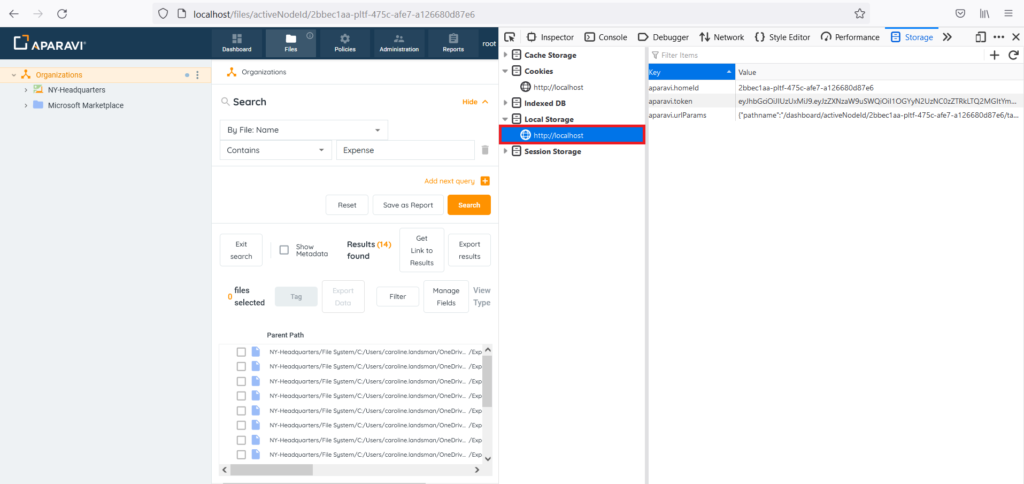
- Once the Developer tools window appears, click on the Application tab, located at the top of the developer tools window.
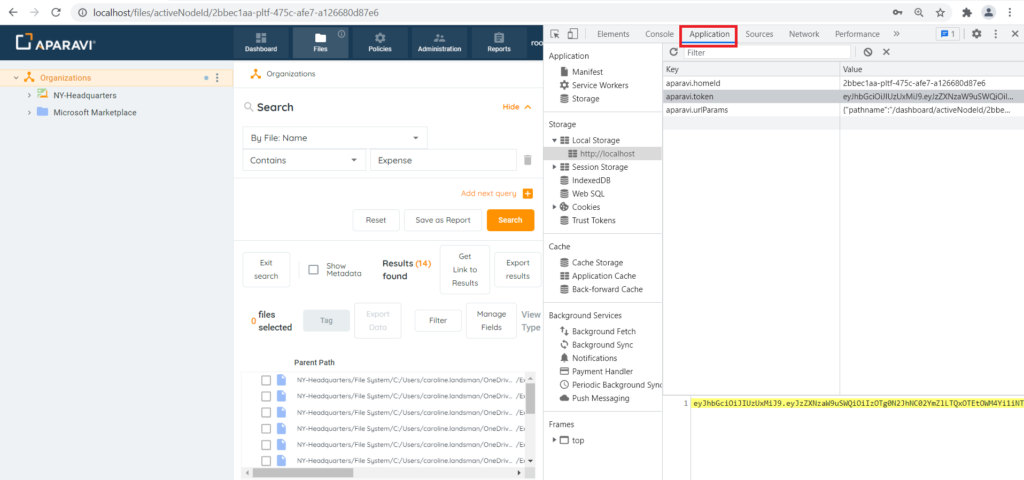
- In the navigation tree located on the left-hand side of the developer tools window, under the Storage section, expand the options for Local Storage by clicking on the arrow to the left of it’s name.
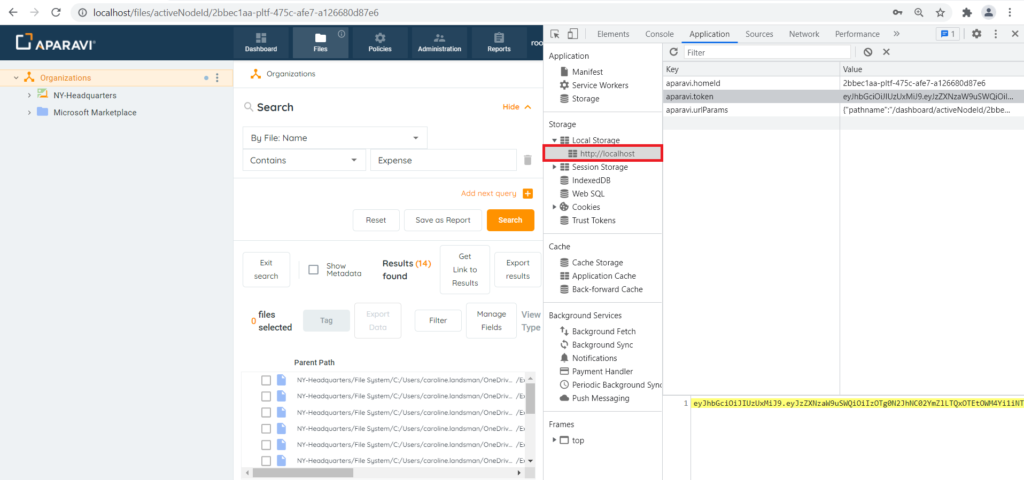
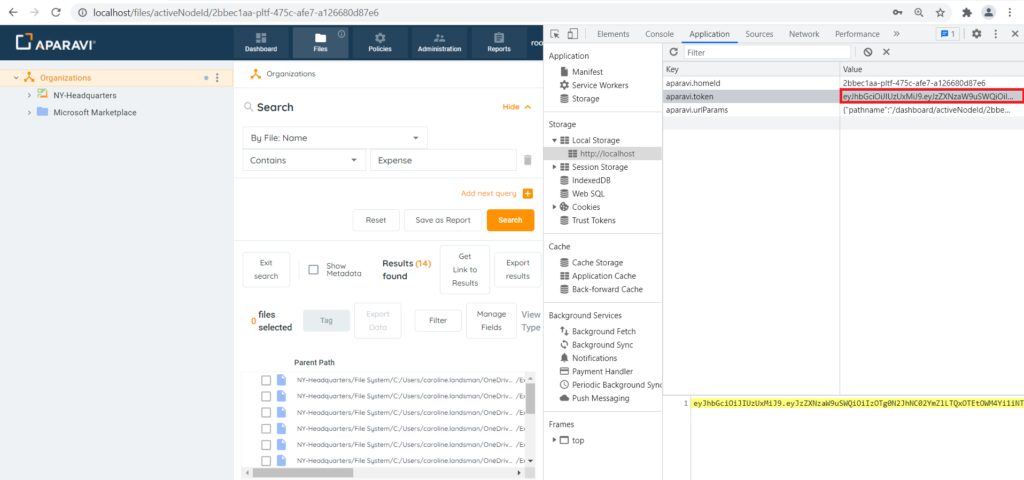
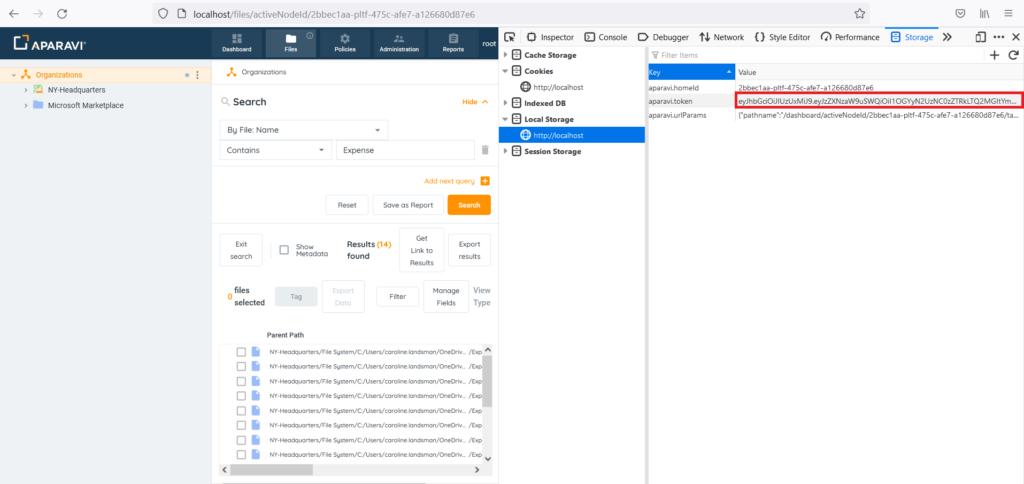
- Click on the Aparavi host that appears and then copy the entire contents of the [aparavi.token] section.
Open Developer Tools in Firefox:
- Return to the Firefox browser and log into the Aparavi Platform (Stay on this webpage and do not leave before completing next step).
- Click on the hamburger menu that appears in the upper right-hand corner of the Firefox browser.
- When the menu appears, click on the [More tools] option.
- Once clicked, a sub-menu will appear displaying additional options. Click on the [Web Developer Tools] option, located at the top of the list.
- In the developer tools window that appeared, click on the Storage navigation tab, located in the toolbar.
- In the navigation tree in the developer tools window, under the Local storage section, expand the options by clicking on the arrow to the left of it’s name.
- Click on the Aparavi host that appears and then copy the entire contents of the [aparavi.token] section.
10. Return to Microsoft Excel, where the From Web pop-up box will still be displaying. Paste the copied token into the field located to the right-hand side of where the word Authorization was typed into.
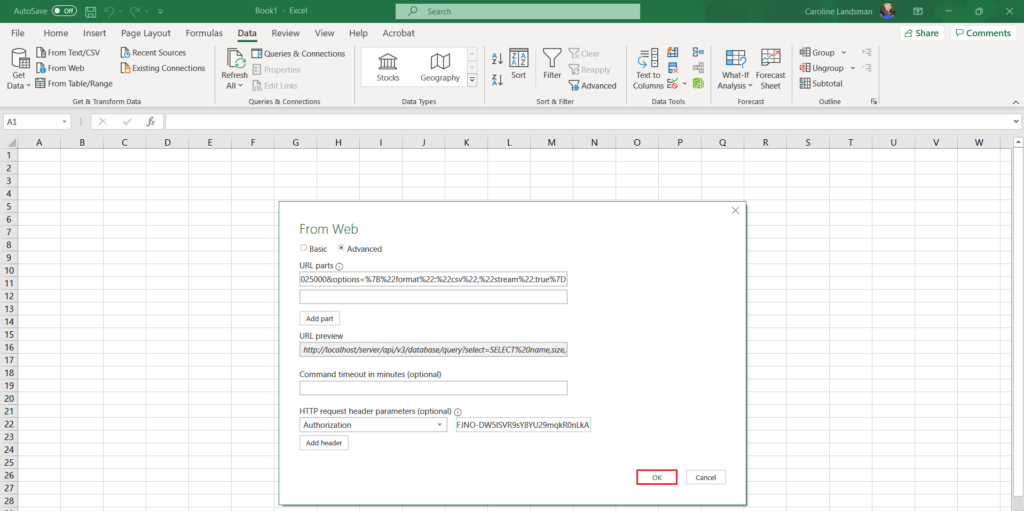
11. Once all information has been entered into the From Web pop-up box in Excel, click the Ok button, located at the bottom right-hand side of the pop-up box.
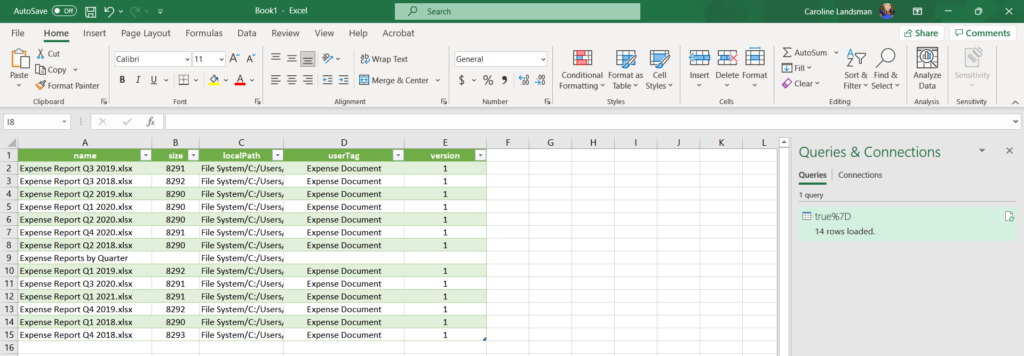
12. Once the changes have been saved, Microsoft Excel will produce another pop-up box, displaying all the file search results that were converted to the generated link. Click the Load button located at the bottom of the pop-up box.
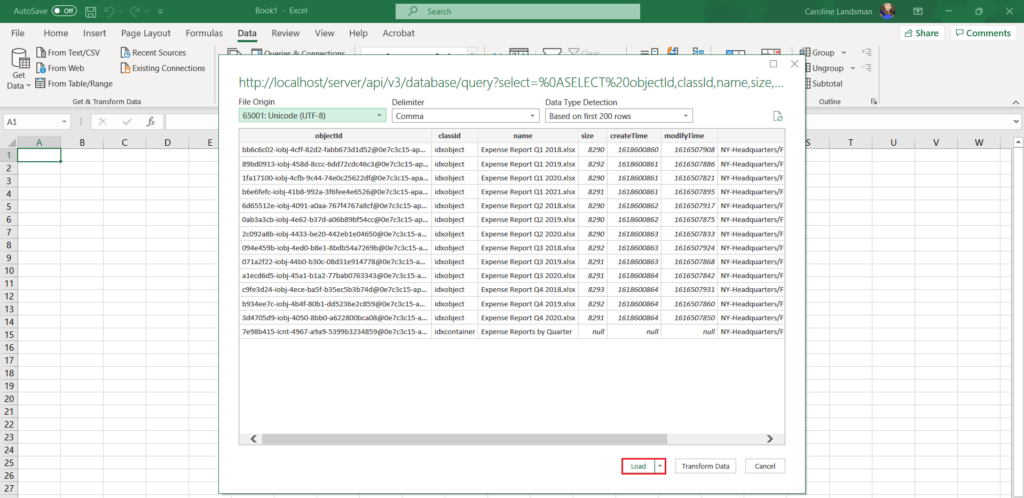
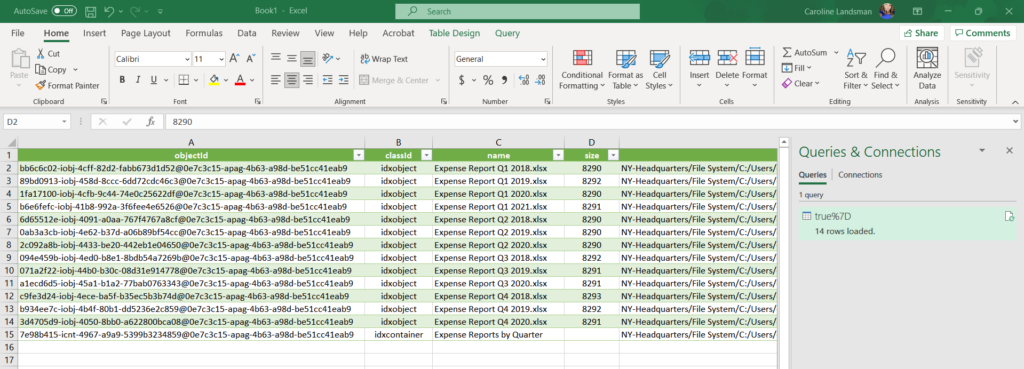
13. Once the Load button has been clicked, Microsoft Excel will automatically populate all data from the file search into the Excel spreadsheet. From here the file can be saved, customized, shared with others and accessed at any given time.
Please Note: When new files meet the criteria of the file search in the Aparavi system, the spreadsheet will automatically update to include the new scanned files.
Please Note: any fields that contain dates [Create Date/Modify Date/Etc.] will be converted to Unix time when the results are displayed in Excel.
For Example: [1616681792] would display inside the date field in Excel and this number represents the date [Thursday, March 25, 2021 2:16:32 PM] (GMT). To convert the date field in Excel to a different format, follow the instructions in this linked document.
Configuring Microsoft Excel with Aparavi Credentials
After the first time the Get Link to Results feature is used, Microsoft Excel can be configured to accept the Aparavi username and password, so that many of the steps completed the first time will not have to be completed again.
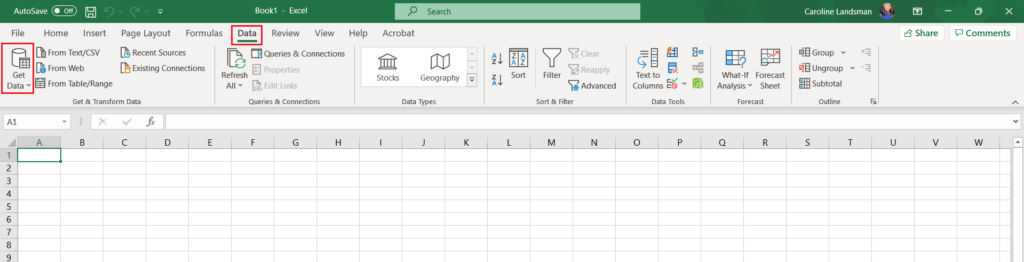
1. Open Microsoft Excel on the local host machine and click on the Data navigation tab. Once there, click on the Get Data button, located in the upper left-hand side of the Excel spreadsheet toolbar.
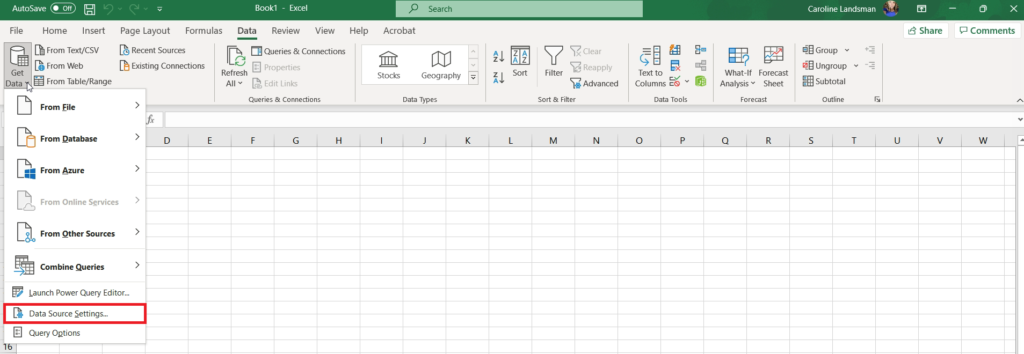
2. From the menu that appeared, click on the Data Source settings option. Once clicked, the Data Source settings pop-up box will appear.
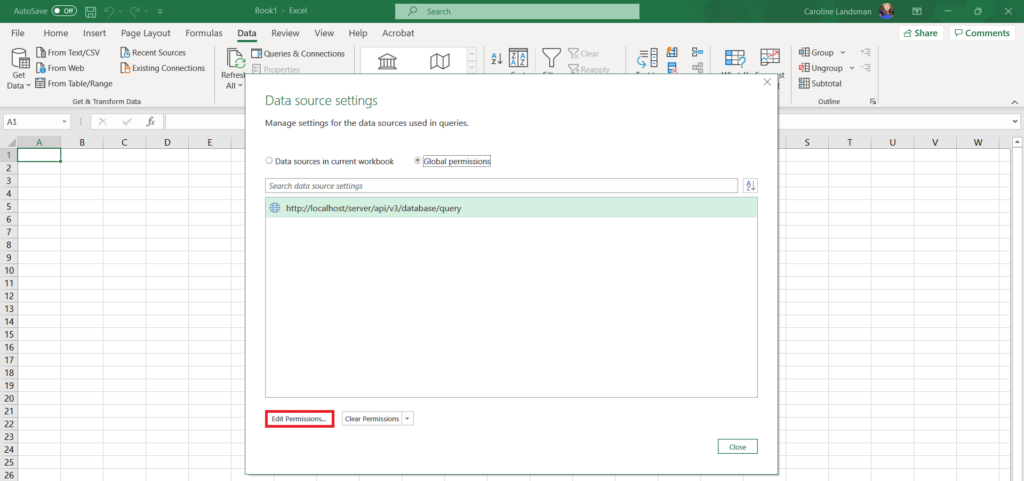
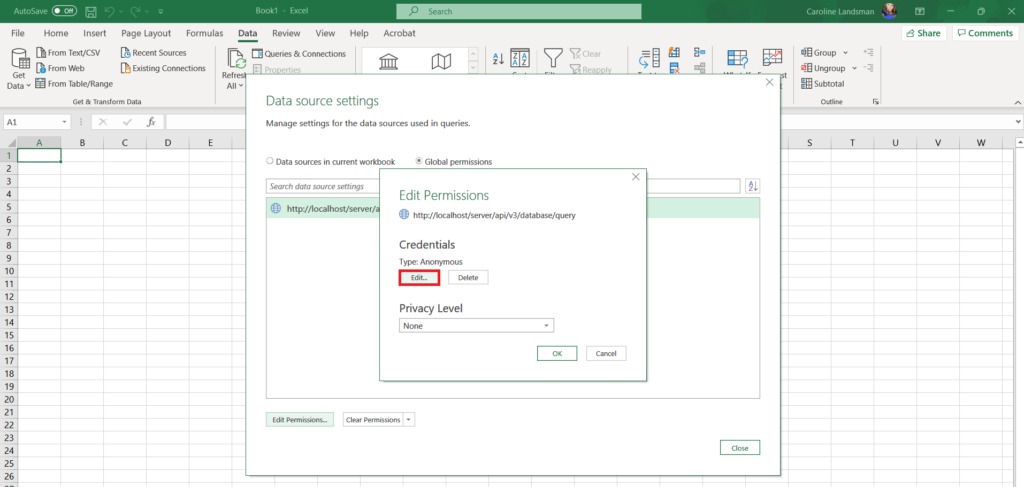
3. Inside of the Data Source settings pop-up box that appeared, click on the Aparavi entry listed and then click on the Edit Permissions button.
4. Inside the Edit Permissions pop-up box, click on the Edit button. Once clicked the Access Web content pop-up box will appear.
5. Inside of the Access Web content pop-up box, click on the Basic option, located on the left-hand navigation tree.
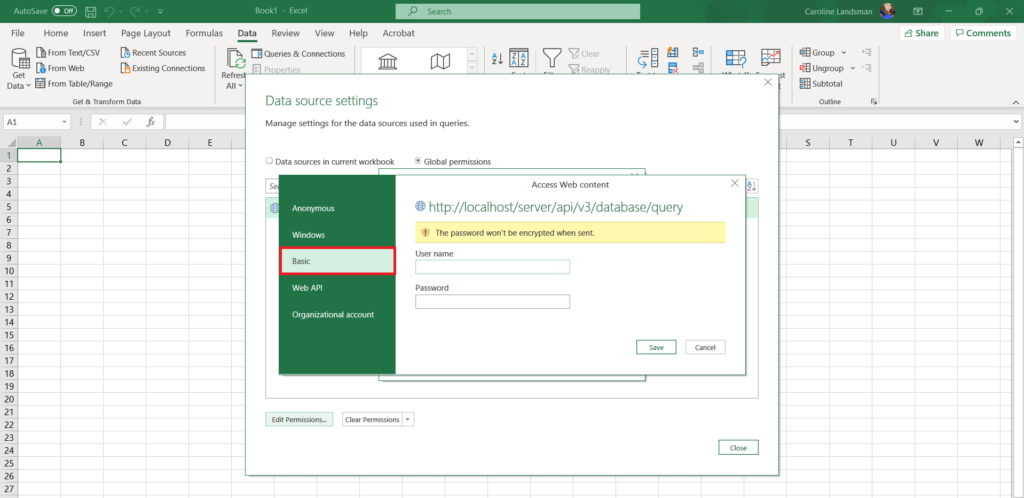
6. Once clicked, the pop-up box will contain two fields, enter the correct Aparavi username and password and then click the Save button.

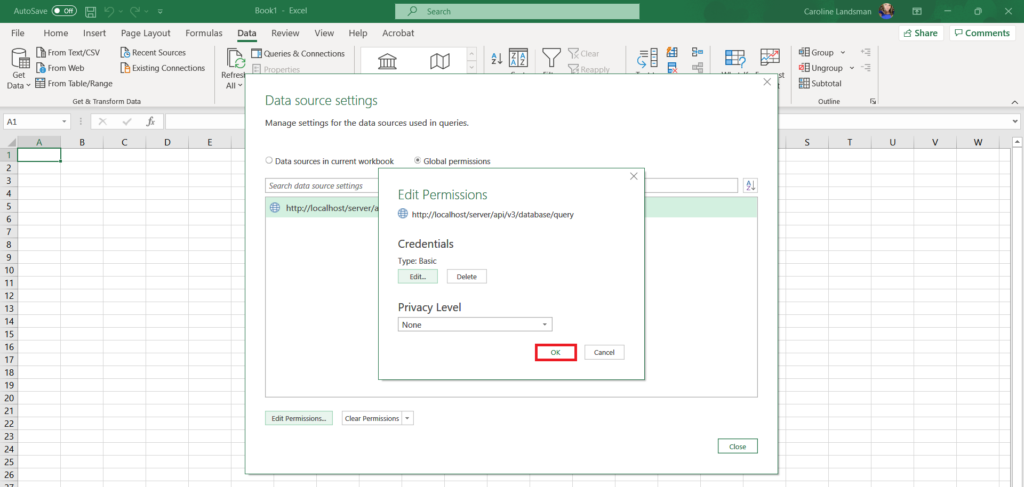
7. Once saved, the Edit Permissions pop-up box will appear again. Click on the Ok button to close it.
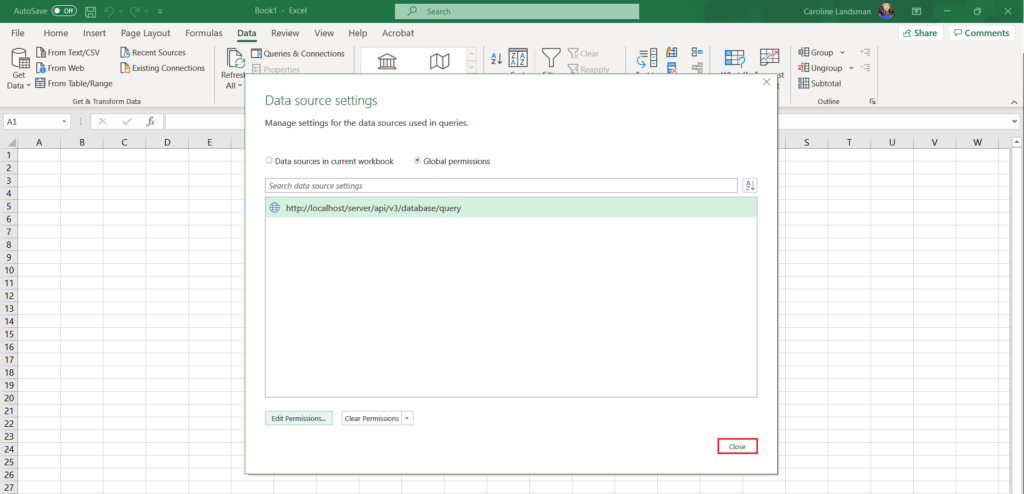
8. Once closed, the Data source settings pop-up box will display again. Click on the close button to complete the process.
Please Note: From this point forward, opening the developer tools and obtaining the Aparavi token will no longer need to be completed when using the Get Link to Results feature.
Get Link to Results – Subsequent Feature Use – CSV File Format
After Microsoft Excel has been configured with the Aparavi credentials, the Get Link to Results feature requires different and fewer steps to complete.
1. Click on the File tab in the top navigation menu and complete a file search.
2. Once the file results are displaying, click on the Get Link to Results button that appears in the toolbar above the file results. Once clicked, the Get Link to Results pop-up box will display.
3. Inside the Get Link to Results pop-up box, configure the settings for the generated link.
Configuration Options:
- Export type – select the output format for your query results. The options are csv and json formats.
- Stream – the maximum number of query results returned is 25,000. If your results are greater than this limit, you can use the Stream option to paginate your results per URL (25,000 max for each link generated). By default the Stream option is enabled.
- Start results at – Enter the position to start the query results.
- Number of results – Enter the number of results to include, starting from the Start results at value.
4. Once all settings have been configured, the system offers two options to gain access to the link:
- Save to Clipboard – selecting this button will save the generated URL to your local computer’s clipboard. This link can then be directly pasted into Excel.
- Save to File – selecting this button will save the generated URL to a file on your local computer (location determined by your browser setting for downloads). Once the file has been downloaded, it can be opened to copy and paste the URL into Excel.
5. Depending on the option that was selected in the step above, obtain the link that was generated and copy it.
6. Open Microsoft Excel on the local host machine and click on the Data navigation tab. Once there, click on the From Web button, located in the upper left-hand side of the Excel spreadsheet toolbar.
7. Once the From Web pop-up box appears, leave the default option [Basic] selected and paste the copied URL from Step #5 into the URL textbox.
8. Once all information has been entered into the From Web pop-up box in Excel, click the Ok button, located at the bottom right-hand side of the pop-up box.
9. Once the changes have been saved, Microsoft Excel will produce another pop-up box, displaying all the file search results that were converted to the generated link. Click the Load button located at the bottom of the pop-up box.
10. Once the Load button has been clicked, Microsoft Excel will automatically populate all data from the file search into the Excel spreadsheet. From here the file can be saved, customized, shared with others and accessed at any given time.
Please Note: When new files meet the criteria of the file search in the Aparavi system, the spreadsheet will automatically update to include the new scanned files.
Please Note: any fields that contain dates [Create Date/Modify Date/Etc.] will be converted to Unix time when the results are displayed in Excel.
For Example: [1616681792] would display inside the date field in Excel and this number represents the date [Thursday, March 25, 2021 2:16:32 PM] (GMT). To convert the date field in Excel to a different format, follow the instructions in this linked document.